Storage Backends
Filesystem
Amazon S3
In order to use knoxite with AWS S3, you need to set up an IAM-Identity first, as you cannot use S3 as a root-user. It is also recommended to create a separate IAM-Identity for each application. Find more about creating IAM-Identities here or below.
URL Scheme
You can create a repository using knoxite’s s3 or s3s (for usage with SSL) protocols:
knoxite repo init -r s3s://[username]:[password]@s3.amazonaws.com/[region]/[bucketprefix]
However, it is not considered safe to use username and password here. Instead,
it is recommended to use access keys. The access key id as well as the secret
access key can then be used by knoxite using the AWS_ACCESS_KEY_ID and
AWS_SECRET_ACCESS_KEY environment variables. You can find more information about
creating access keys for your IAM-Identity below.
A repository will be stored as 3 different buckets on S3. Those buckets will be generated automatically. The names of the buckets are:
[bucketprefix]-chunks[bucketprefix]-snapshots[bucketprefix]-repository
All s3 bucket names are unique globally. Therefore, please consider choosing a reasonable bucketprefix. You can find more information on restrictions and naming requirements of s3 buckets here.
Create an IAM-Identity with an Access Key
For more detailed instructions, please refer to the official AWS documentation.
While it is not required to set up a separate IAM-Identity for knoxite itself, it is recommended to do so. However, you can also just create an Access Key for your Administrator (or really any other IAM-User with the right permissions).
After logging into the AWS Management Console, go to the IAM-Dashboard:

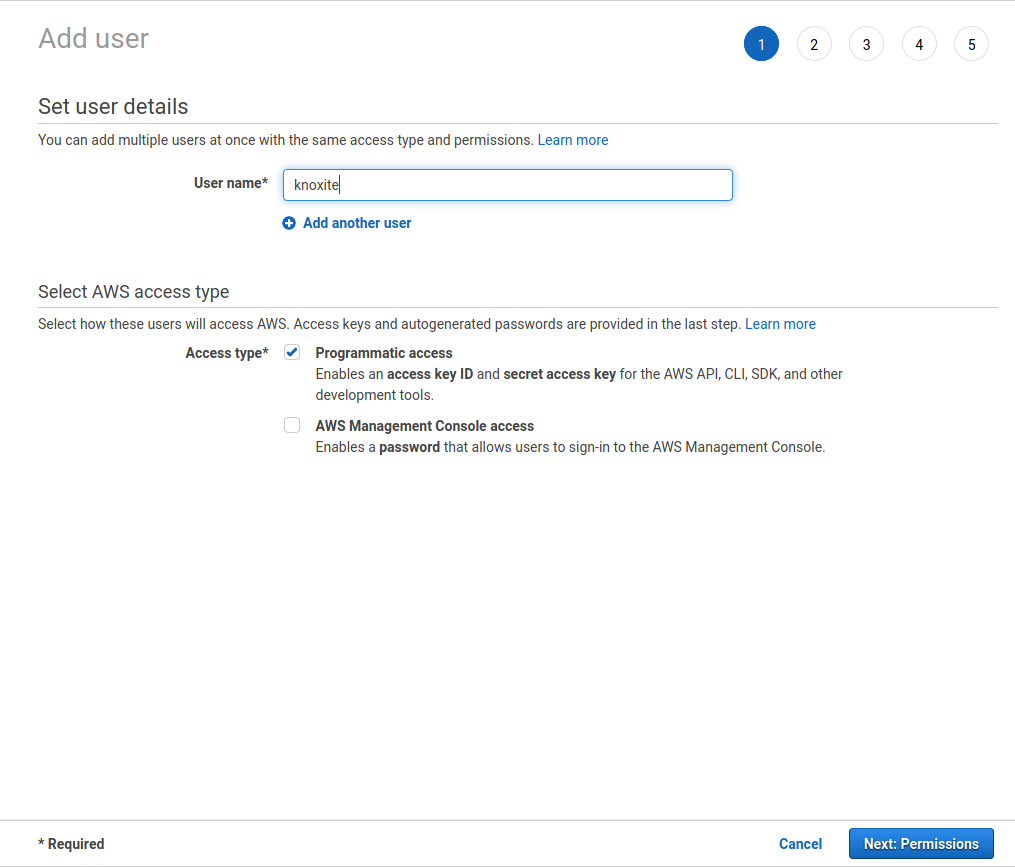
On the IAM-Dashboard, go to Users and add a new user:

Select a username for your knoxite-User. As “Access Type”, choose “Programmatic access”. Press next.
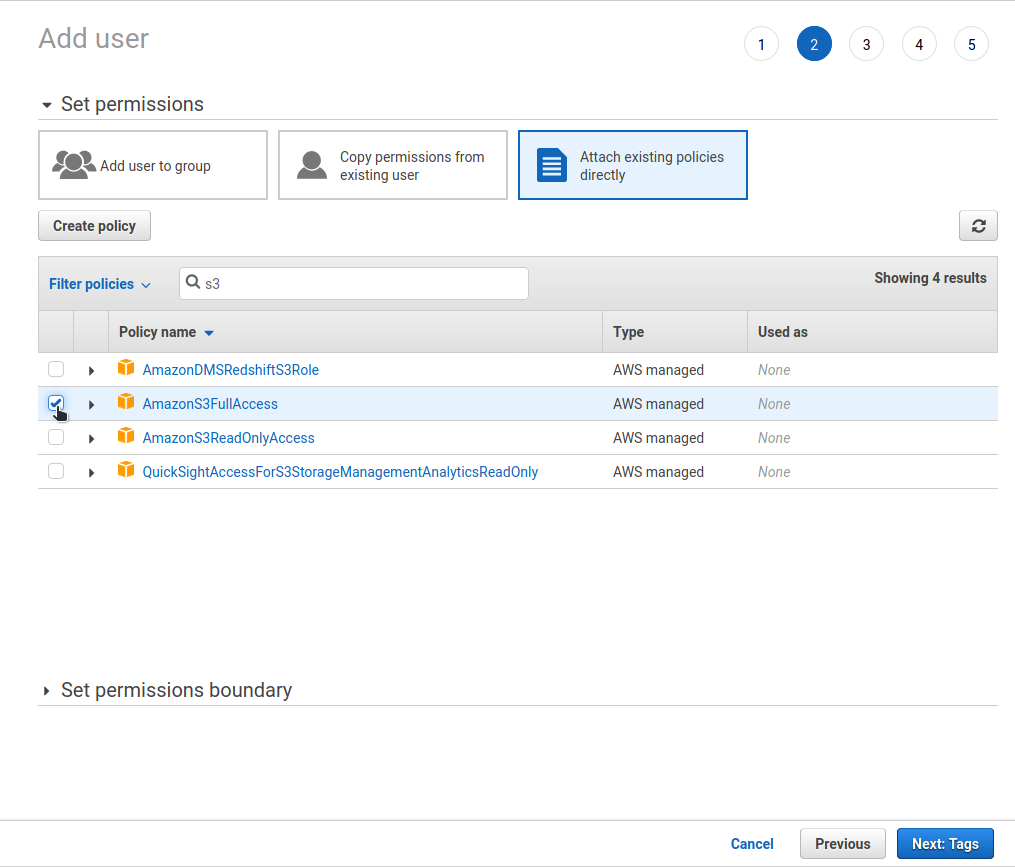
As we only want to use this user to interact with our s3 buckets, select “Attach existing policies directly”, search for s3 and select “AmazonS3FullAccess”. Press next. If you do not want to set any tags, you can just continue and press next again.
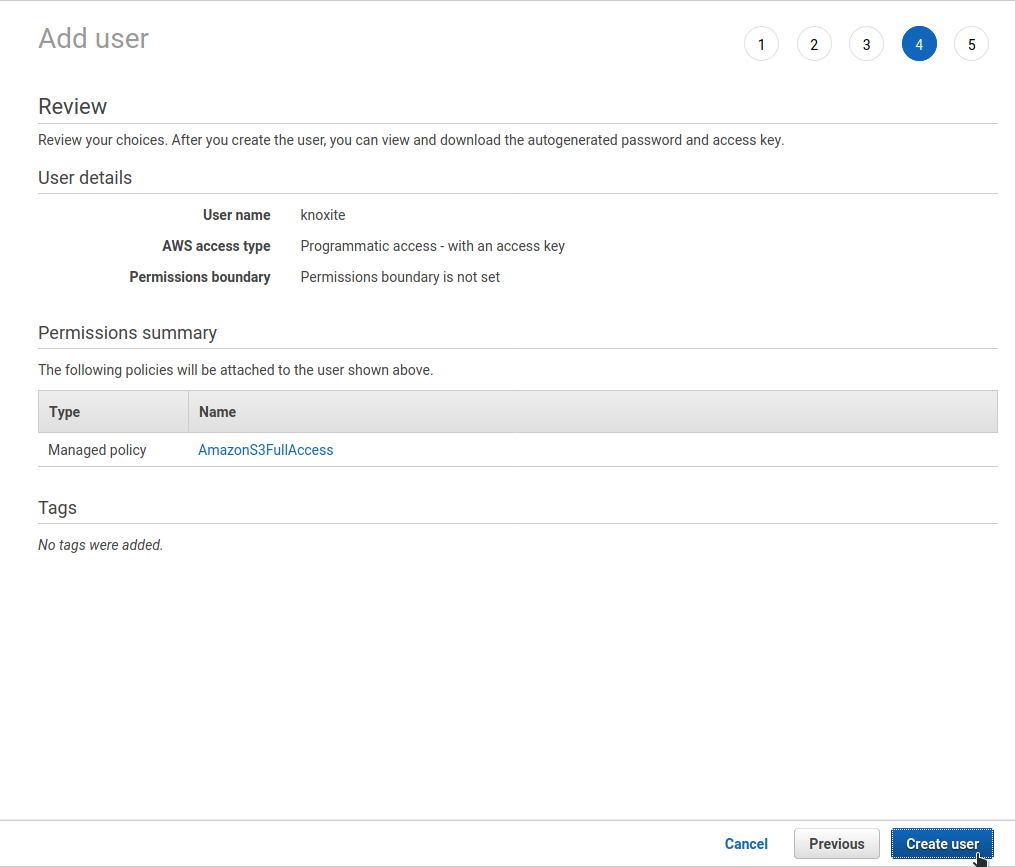
Review the new user and press “Create user”.
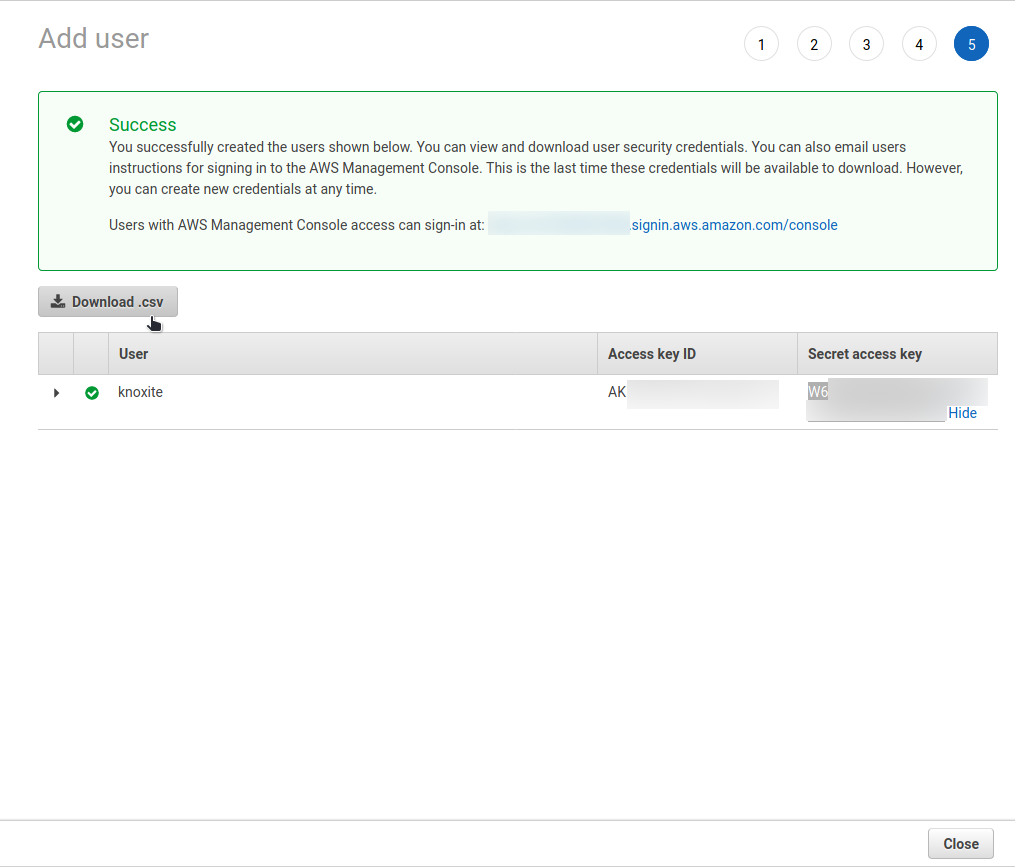
Now, you can copy the “Access key ID” as well as the “Secret access key” and use them with knoxite.
Azure File Storage
In order to store data on Azure you need to set up an Azure File Storage for your knoxite repository first.
URL Scheme
You can create a repository using knoxite’s azurefile protocol:
knoxite repo init -r azurefile://[storage_account_name]:[access_key]@[endpoint]
On Azure you can find the storage account name and the access key at Storage Account > Access keys.
Note:
Be aware that the access token needs to be URL-encoded.
Endpoint
The endpoint is the URL of the folder you want your repository stored in. The storage account name as a prefix of the URL is optional, so you can use either one of the following formats:
[account].file.core.windows.net/[share]/[path] or
file.core.windows.net/[share]/[path]
Example
azurefile://account:Dbx...%2Fz7U...%2FQLX...B6w%3D%3D@file.core.windows.net/share/path
Setting up your Azure File Storage
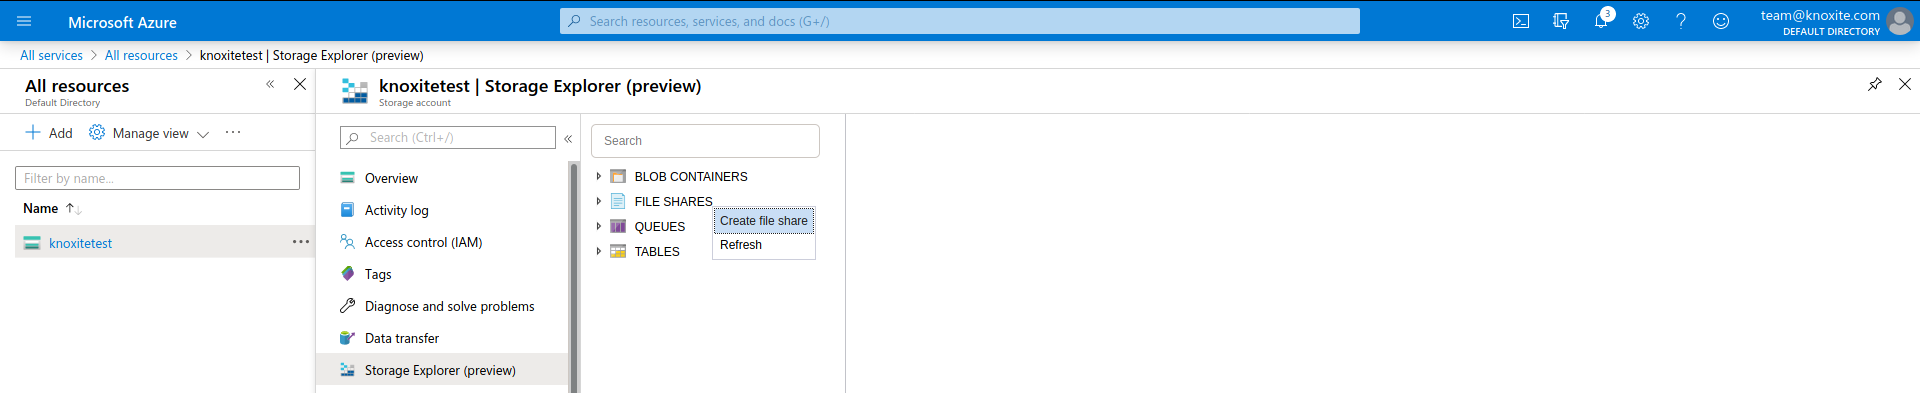
In order to use Azure File Storage you need to add a resource of the type Storage account - blob, file, table, queue. Then you can use the Storage Explorer to create a new File Share.
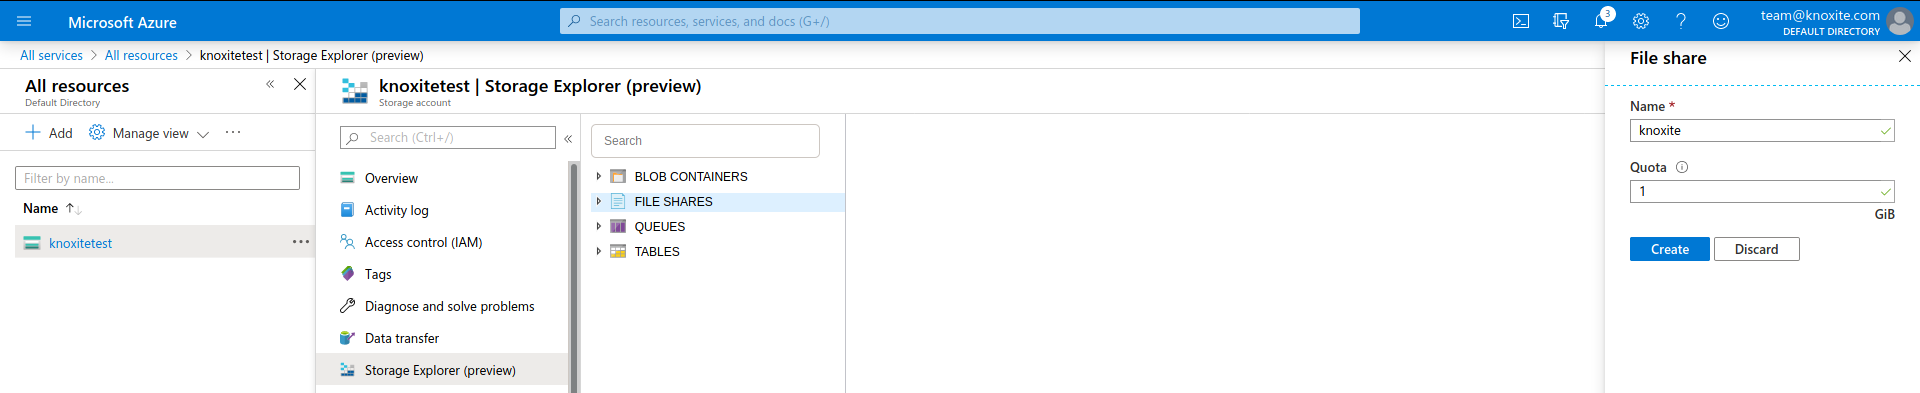
After that you can set Name and Quota. Always keep an eye on your qouta because knoxite may fail to store files when the maximum is reached.
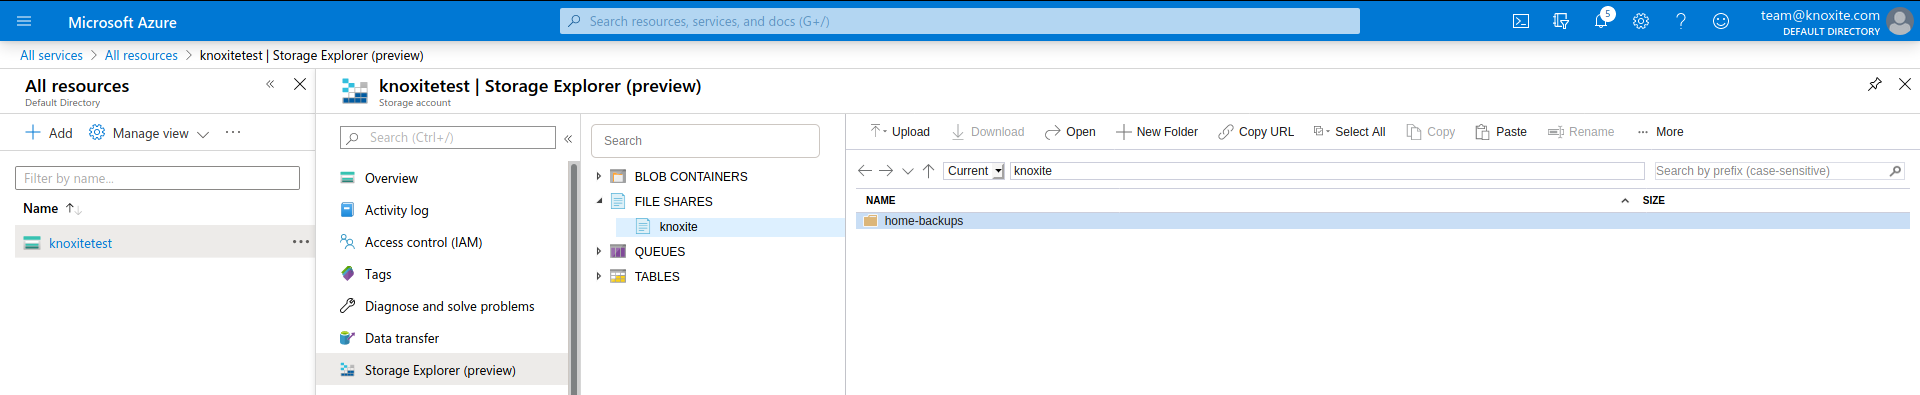
The next step is to create the root folder for your knoxite repository. Use the New Folder button to add a new folder in the created file share. You can use the Copy URL button to get the endpoint needed for the azurefile repository-URL.
The last missing parameters to complete the URL are the Storage account name and one of the Access keys, which you can simply copy from Settings > Access keys.

Backblaze
In order to to use your B2 Cloud Storage you’ll have to setup an application key first. Then you can use the application’s credentials in knoxite’s repository-URL.
URL Scheme
You can use the backblaze protocol to initialize a B2 Cloud Storage
repository:
knoxite repo init -r backblaze://[keyID]:[applicationKey]@/[path]
Create a new Application
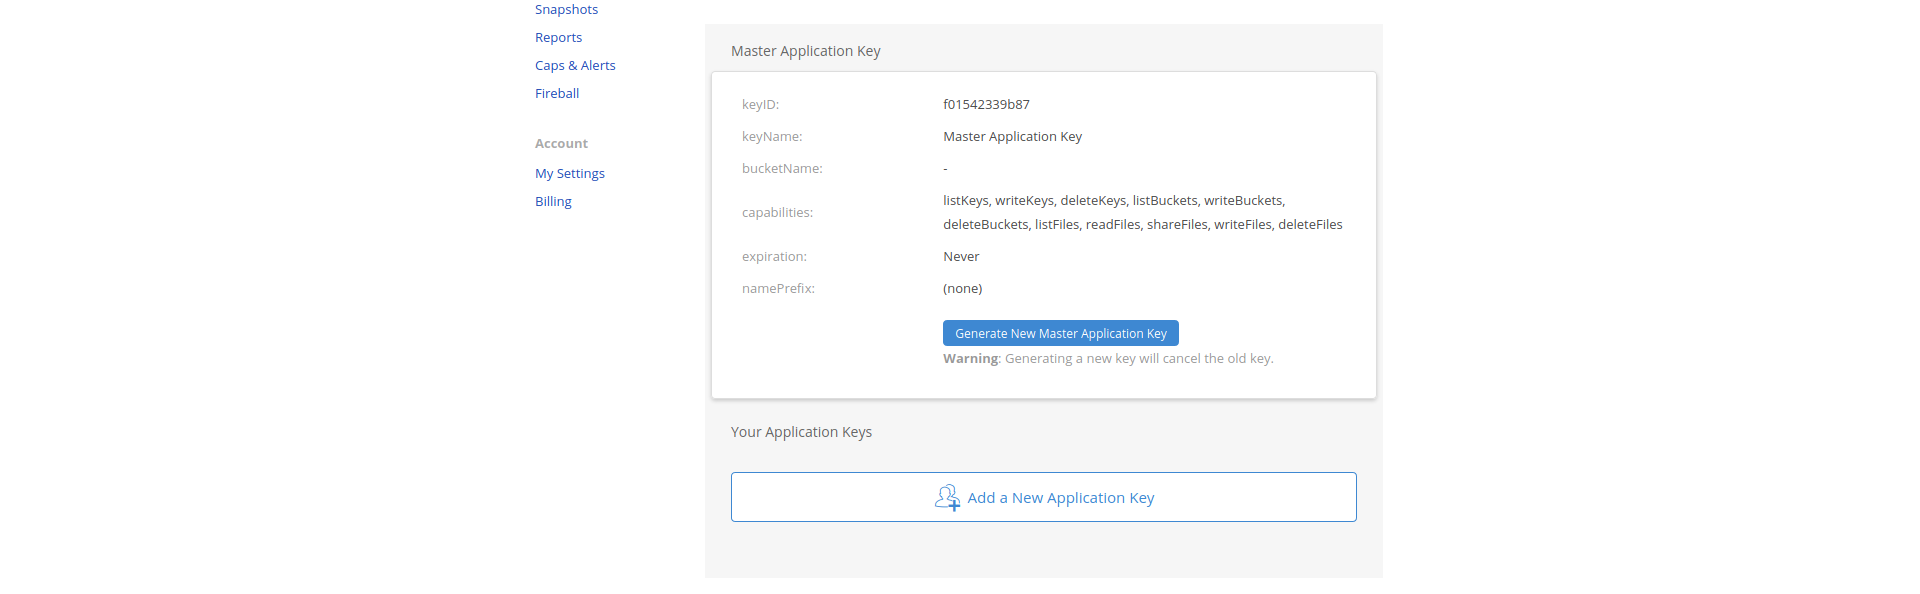
To gather the keyID and applicationKey you’ll have to login to your account on Backblaze and go to the App Keys section. There you can click on the Add a New Application Key Button.
After that you’ll just need to fill in a name for your new application. Optionally you can limit access to certain buckets.
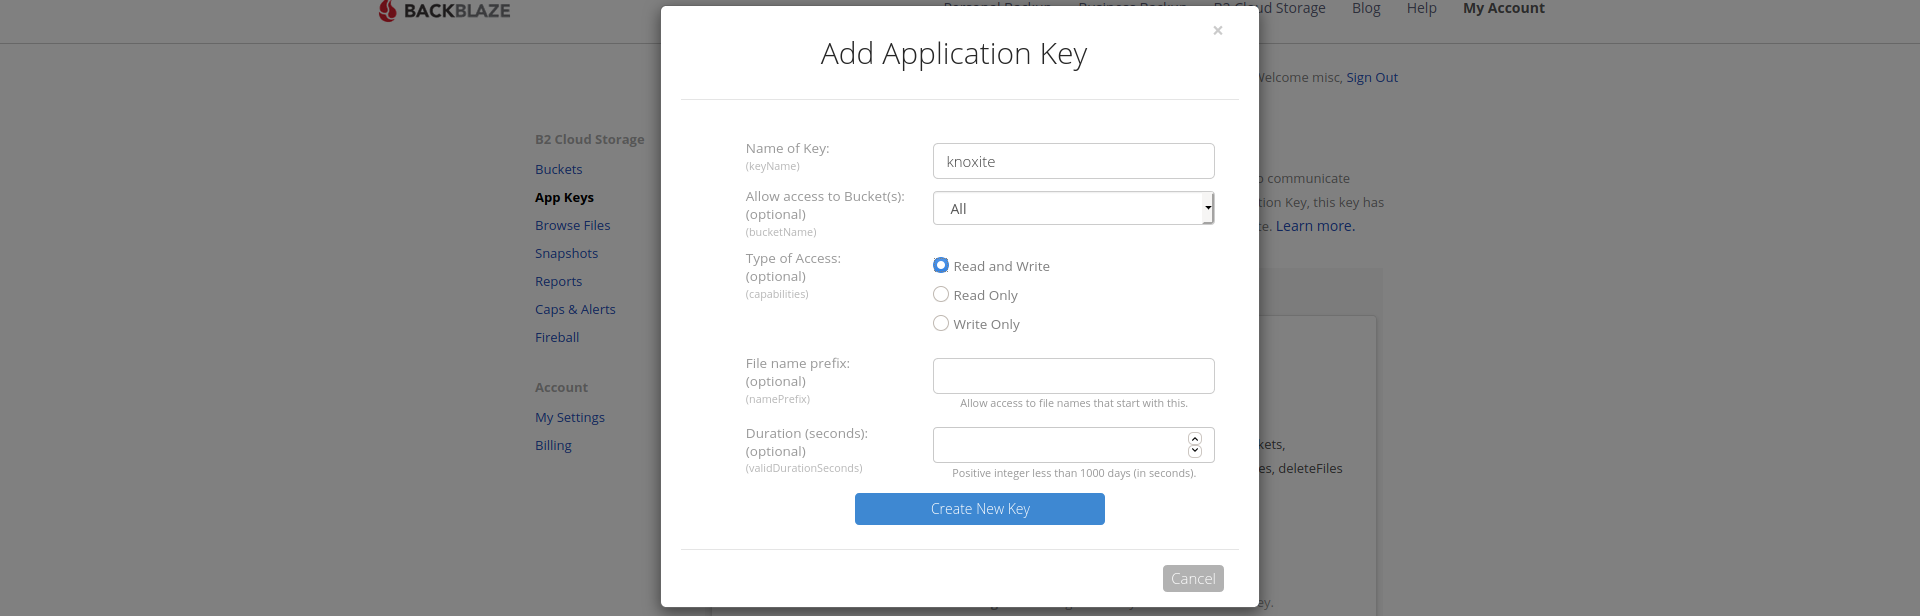
The generated applicationKey and keyID can now be used as part of the repository-URL.

Note that the application key will only be displayed once. Make sure to store it in a secure place.
Dropbox
This is the storage backend for the Dropbox cloud storage.
Usage
You’ll need to provide an OAuth2 access-token in the repository-URL in order for the Dropbox storage backend to work:
knoxite repo init -r dropbox://[access_token]@/[path]
Retrieving an access-token
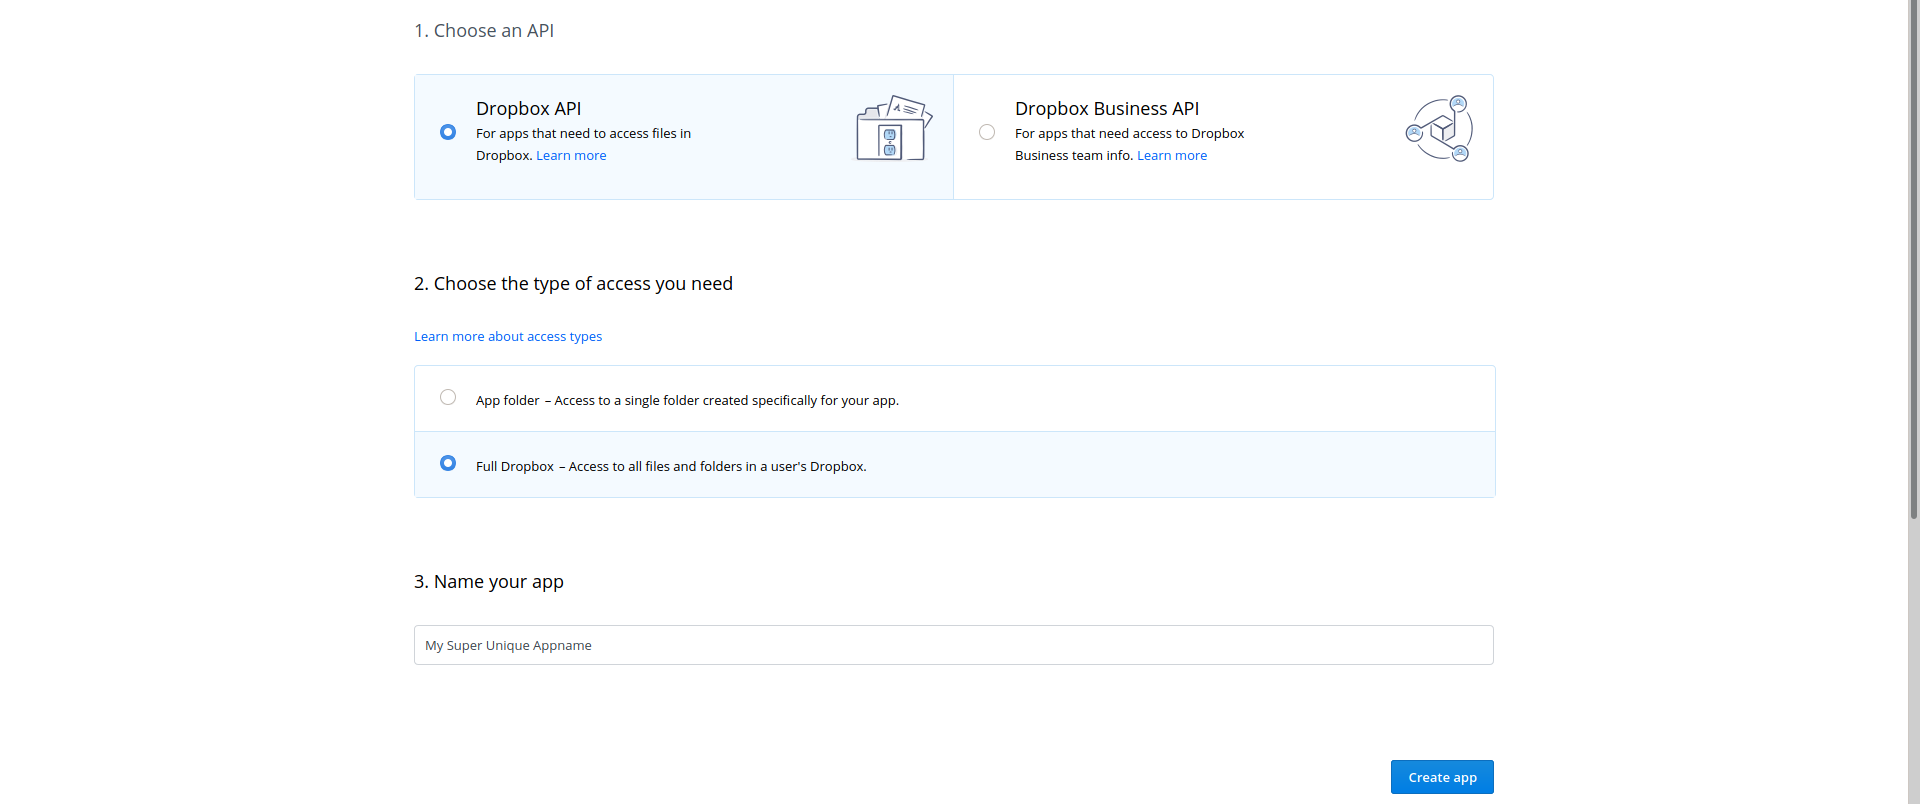
Assuming you already have an account on Dropbox you’ll have to create an app on Dropbox’s developer platform. This can be done here. You can either grant knoxite full access to all folders on your Dropbox or limit its permissions to a single folder. Note that the name for your Dropbox app has to be unique.
After creating the app Dropbox will redirect you to its info page. Here you will have to generate the OAuth2 access-token for knoxite. This can be done with a single click on the corresponding button:

This access-token can now be used in knoxite’s repository-URL. It is recommended to save the token in a secure place as Dropbox will only show it to you once. You can however always generate a new token.

FTP
Storing data via the File Transfer Protocol is done with this backend. You’ll
have to provide a password and username in order to authenticate to the server.
When no port address is provided knoxite will use the standard FTP port 21.
Replace example.com from this example with the address corresponding to your
desired server.
URL Scheme
The FTP protocol scheme looks like following:
knoxite repo init -r ftp://[user]:[password]@example.com:[port]/[path]
Google Cloud Storage
This backend enables knoxite to store data in a Google Cloud Storage bucket. If you are not familiar with Google Cloud Console, see the detailed guide below in the Setting up Google Cloud Storage section.
URL Scheme
You can create a repository using the googlecloudstorage protocol:
knoxite repo init -r googlecloudstorage://[path_to_key.json]@/[bucket]/[path]/
Note:
Be aware that the path to the key needs to be URL-encoded.
JSON key
As mentioned above, Google Cloud expects credentials in the form of a JSON key.
The path to the JSON file, probably stored on your local filesystem, needs to be
provided either via the URL or the GOOGLE_APPLICATION_CREDENTIALS environment
variable.
Unlike the parameter in the URL, the path in the environment variable does not need to be URL-encoded.
When using the environment variable the path to the JSON file can be omitted, as shown in the second example below.
Examples
knoxite repo init -r googlecloudstorage://%2Ftmp%2Fknoxite-733f1cccf67c.json@/knoxite/backups/
knoxite repo init -r googlecloudstorage:///knoxite/backups/
Setting up Google Cloud Storage
There are multiple steps necessary to set up your environment on Google Cloud Console.
Creating a project
Create a project on Google Cloud Storage, should you not have done so previously. This project will be the container for the Google Cloud Storage you want to use.
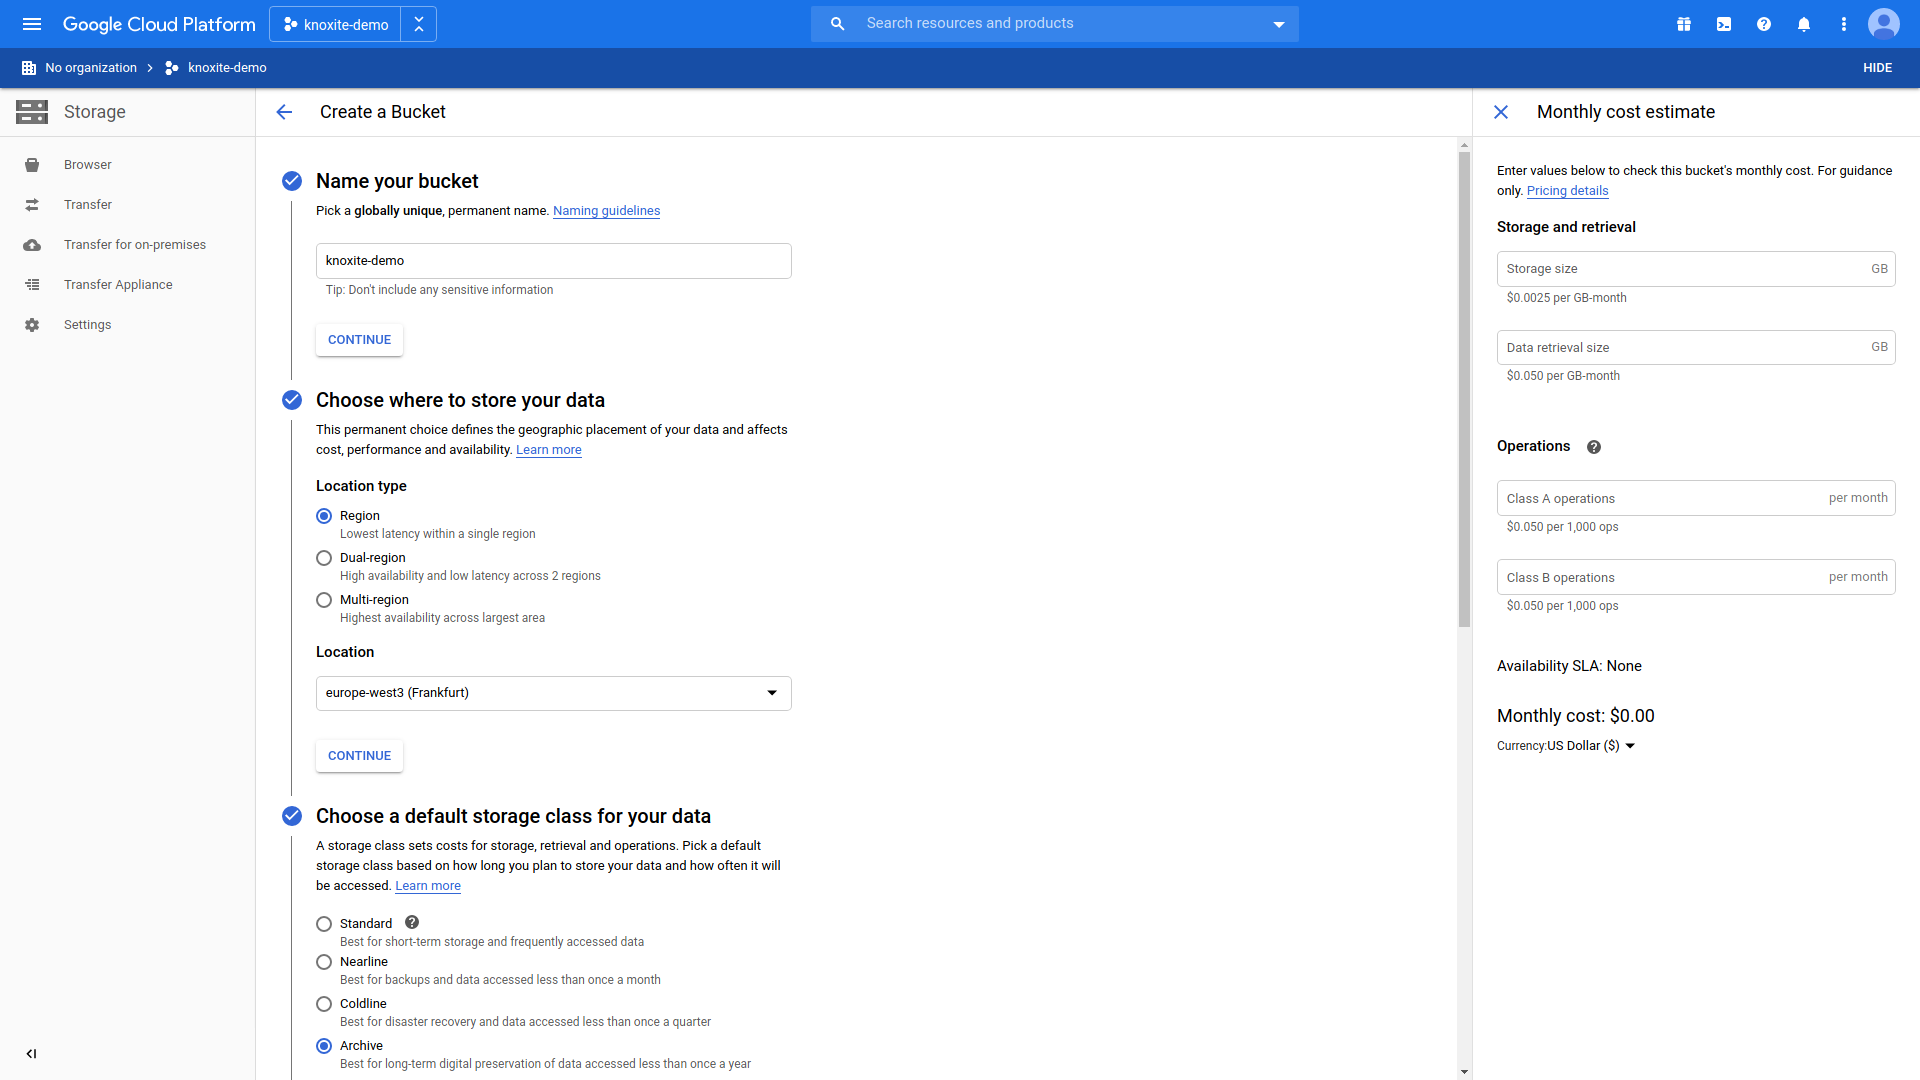
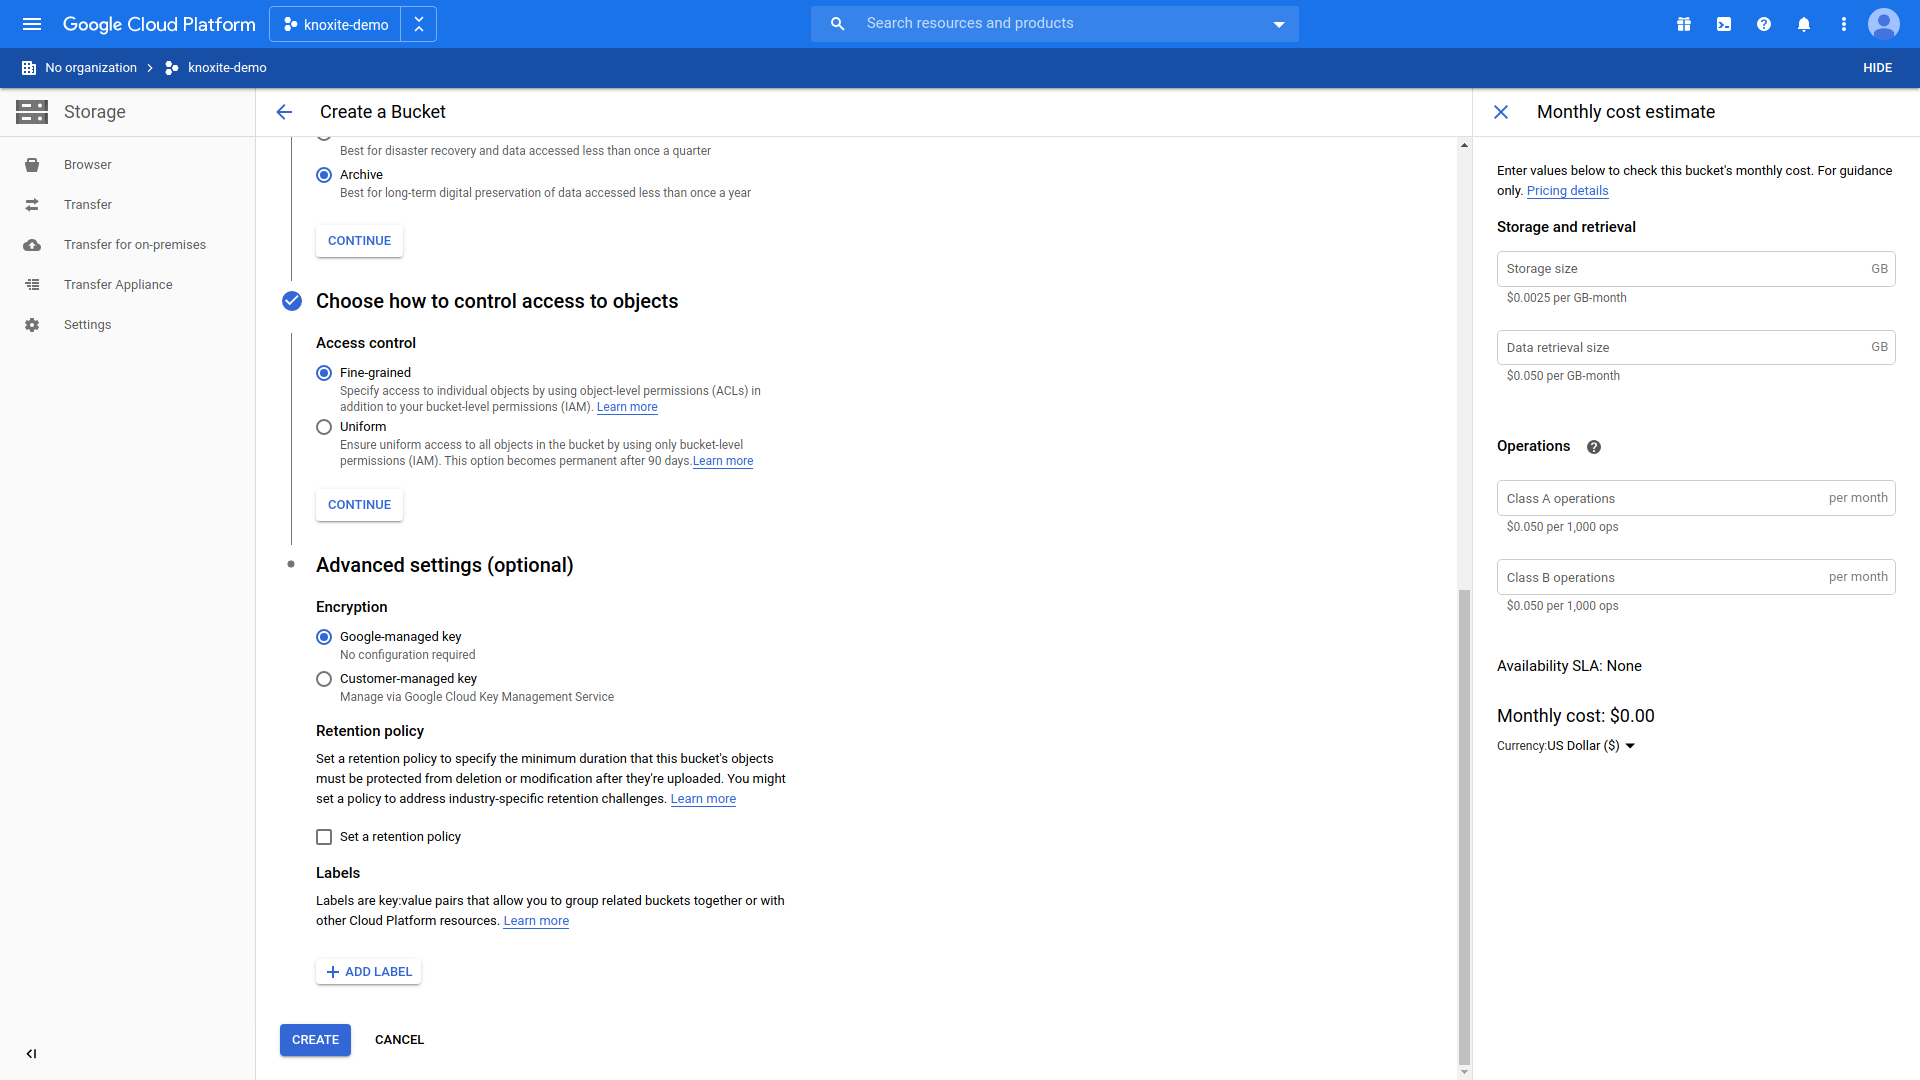
Creating a bucket
In order to create a bucket you need to navigate to Storage > Browser. The preferences chosen here are merely an example, but might be sensible for backups that you only access occasionally.
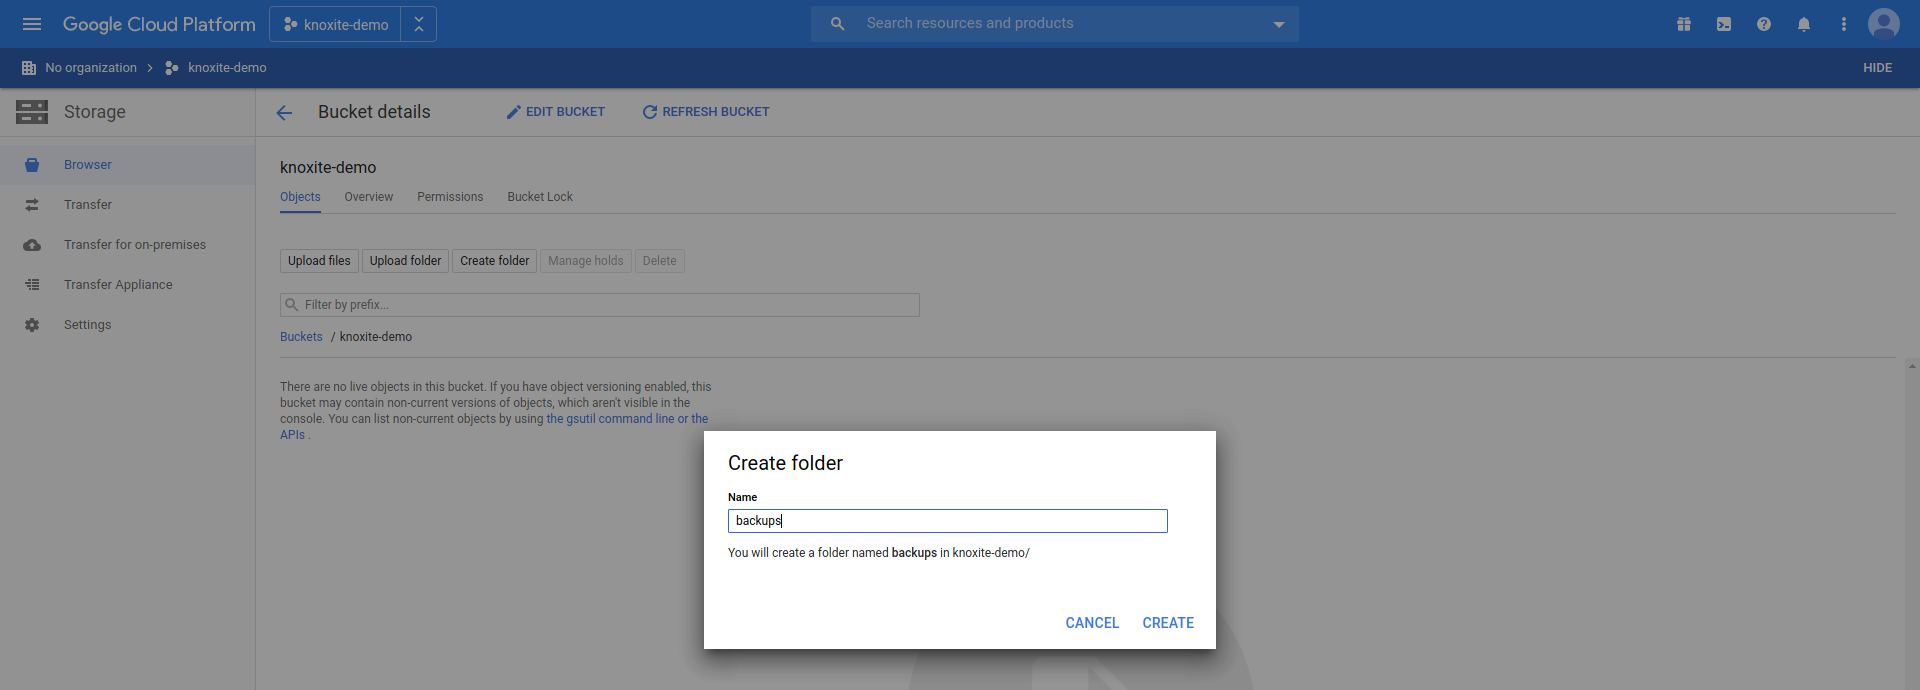
Creating a folder for your repository
After creating a bucket you need to add a new folder, which will be used to
store the repository in:
Creating the folder manually is optional. Knoxite will automatically create a folder within the existing bucket when using a path with following format: googlecloudstorage:///[bucketname]/[foldername].
The location of the repository needs to be a folder inside the bucket, not only the bucket.
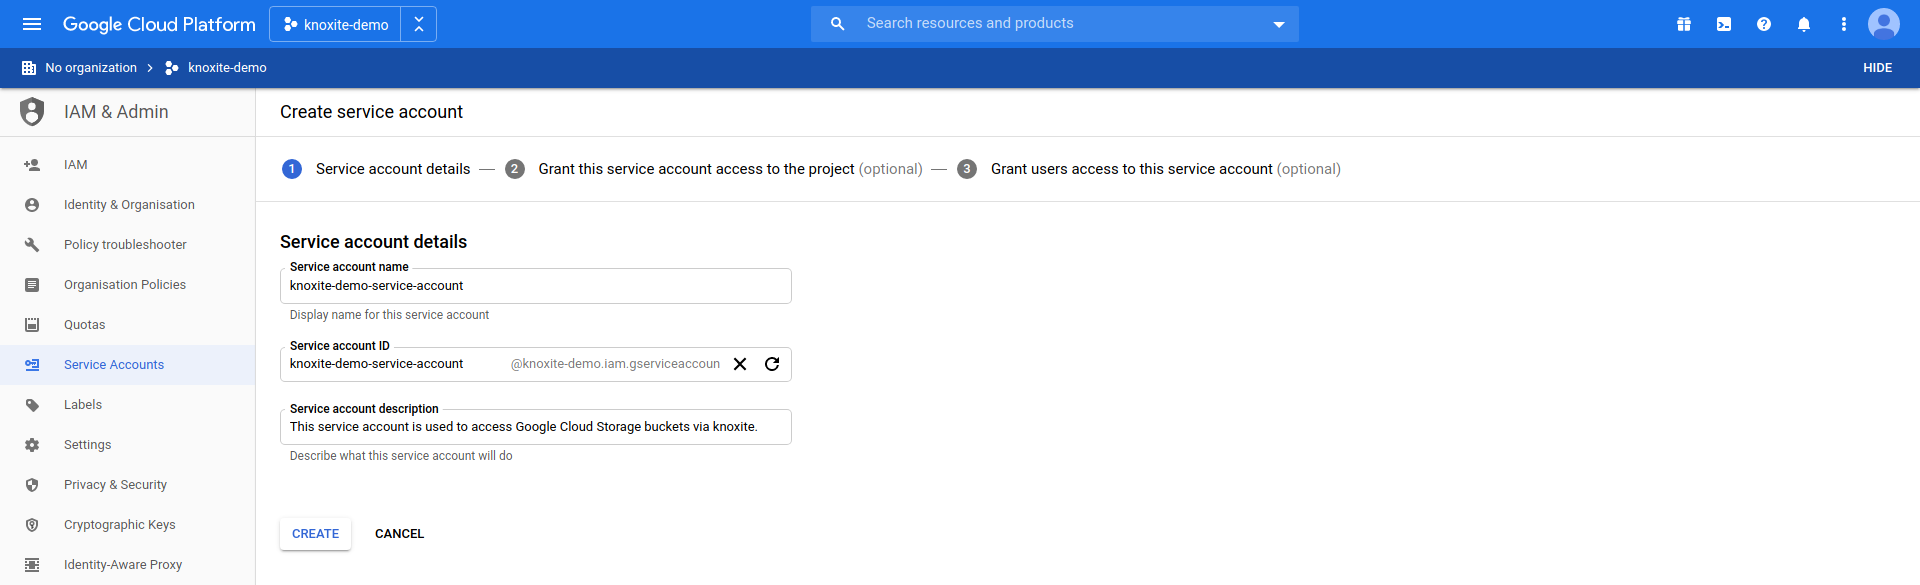
Adding a service account
In order to access the bucket through knoxite you need a service account.
Navigate to IAM & Admin > Service Accounts and create a new service account:
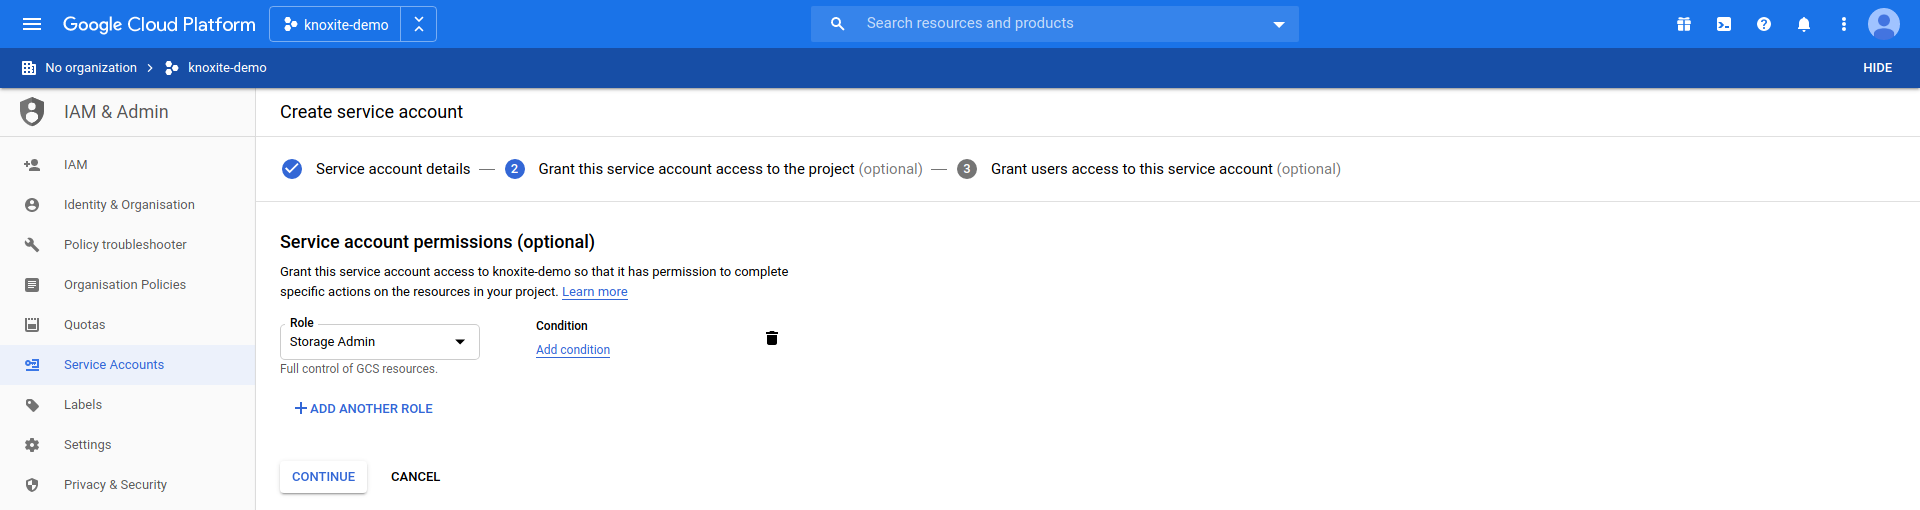
Granting access
For the service account to be permitted to access the bucket, you need to grant it access to the project. For testing purposes we choose the Storage Admin role here. For production use we recommend to set specific roles that fit your needs:
Creating and downloading the key
As the last step of creating a service account you need to create a key, which will be used to authenticate knoxite to access your cloud storage:
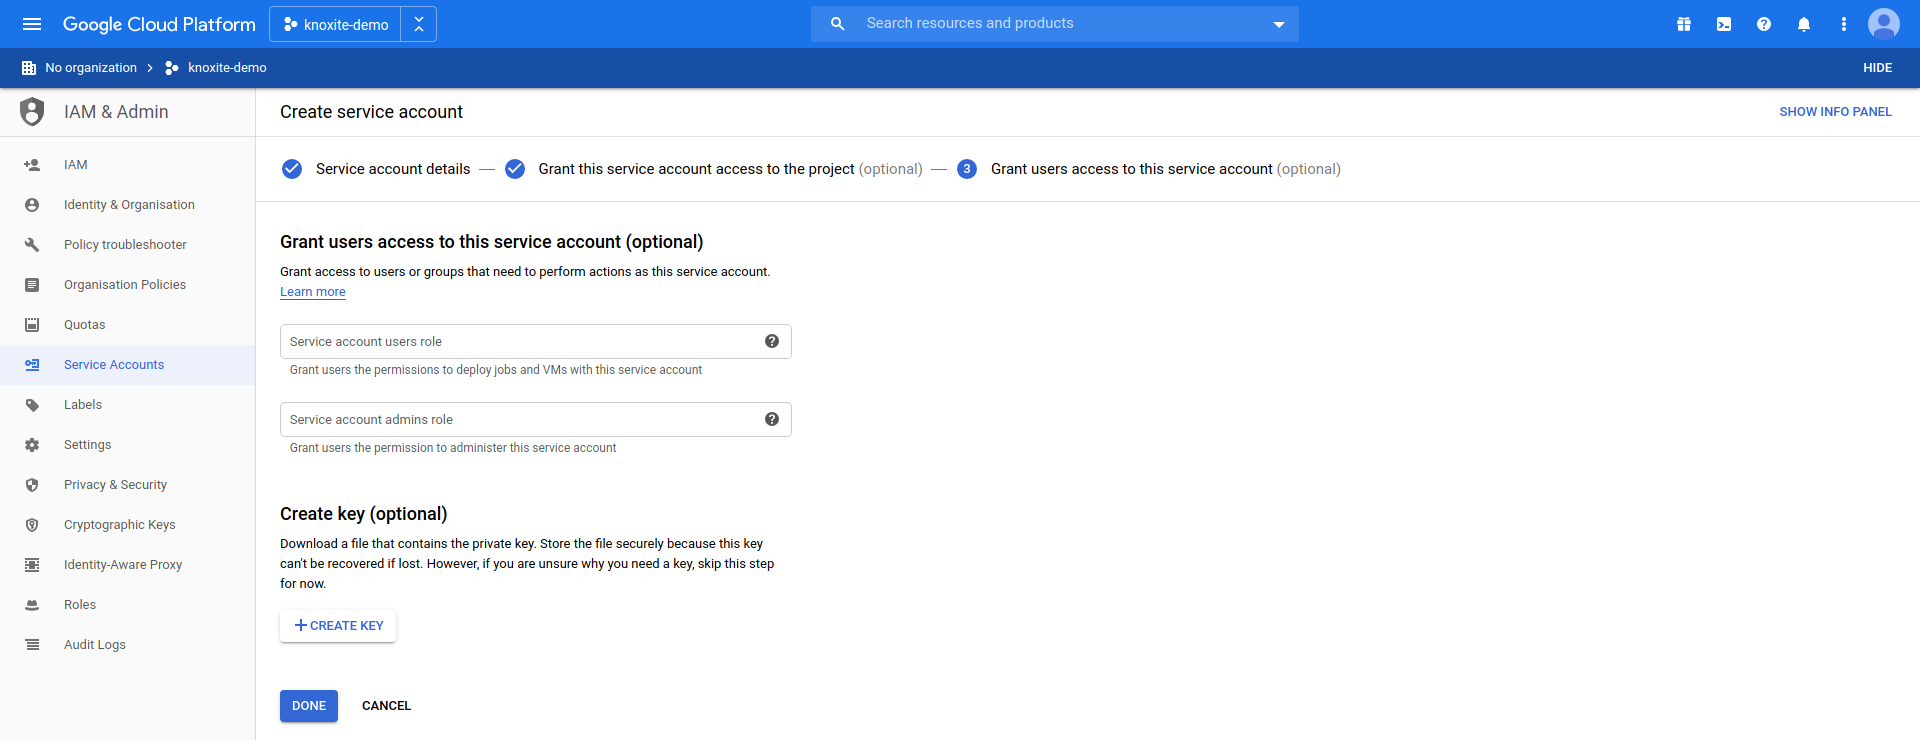
You can only download this key once, so we recommend you store it in a secure place. Of course you are always able to create an entirely new key.
With the key downloaded you are now ready to use the Google Cloud Storage backend.

Mega
To store data on mega you need a mega account and its e-mail address and password.
URL Scheme
You can use the mega protocol in order to interact with this backend.
Note:
Be aware that the e-mail address needs to be URL-encoded.
knoxite repo init -r mega://[email]:[password]@/[path]
Example
knoxite repo init -r mega://user%40example.com:password@/knoxite
Nextcloud
You can connect knoxite to a Nextcloud instance using the WebDAV backend.
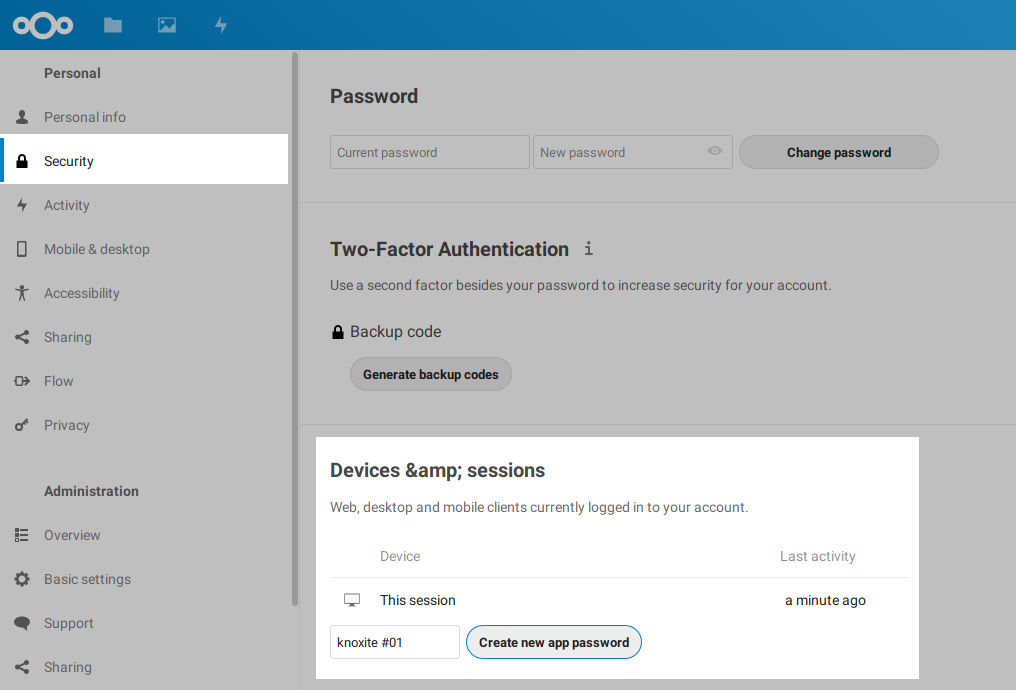
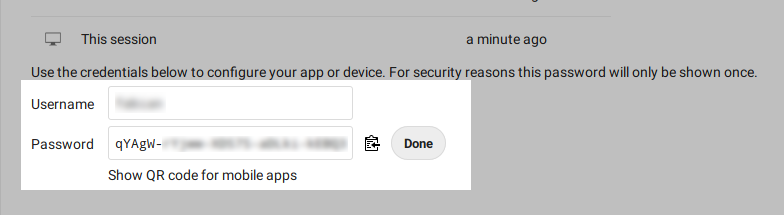
It is recommended to use an app password. To generate one, go to the settings page of your Nextcloud instance. Navigate to the Security section. In Devices & sessions you can generate a new app password.
Save the application password in a secure location, as it can only be shown once.
If you want to save your knoxite repository in a directory, now is the time to create that folder.
Next, you have to get the WebDAV-URL of your Nextcloud instance and modify the URL a bit. Go to your file overview and click on the settings button in the bottom left. A menu containing the WebDAV-URL should appear:
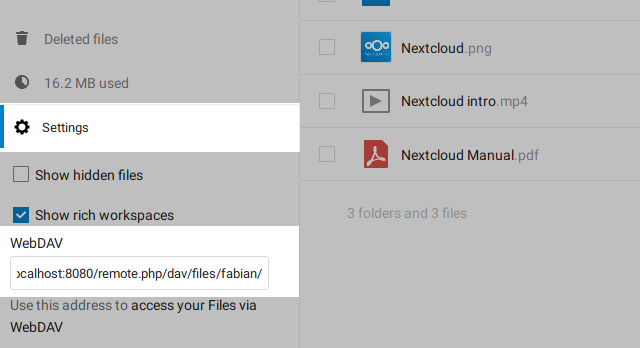
Copy the WebDAV-URL and modify it by the following rules:
- replace the
http/httpsprotocol withwebdav/webdavs - add your username and password to the URL
The URL can now be used to initialize a new repository:
knoxite repo init -r webdavs://[user]:[password]@example.com/remote.php/webdav/[path]
ownCloud
See Nextcloud.
SSH/SFTP
In order to store data on another computer with SSH, you can use the SFTP
backend. You have to authenticate via password or a private key using an
ssh-agent. Make sure to check if $SSH_AUTH_SOCK is set. Verify that
~/.ssh/known_hosts contains a valid host key.
knoxite repo init -r sftp://[user]:[password]@example.com/[path]
WebDAV
Although the WebDAV-backend should be compatible with every WebDAV server, right now it is only tested with Nextcloud and ownCloud.
You have to replace the http / https protocol in the URL with webdav /
webdavs. Authentication works via basic/digest auth. You have to create the
target folder for the repository on WebDAV.
knoxite repo init -r webdavs://[user]:[password]@example.com/[path]